 RePluginX - 兼容AndroidX并加入新特性开发纪要
# 一、RePluginX
因 RePlugin 不支持 AndroidX,官方 github 已经好久不见有新的 Commits,一堆 issue 也没处理,难免让人觉得官方是否已经放弃了该项目。而公司开发需要使用到 RePlugin,但需要对其进行定制,向官方提交 pr 大概率是石沉大海,脑袋一拍,不如做做善事,自己基于 RePlugin 维护一个功能更强的 RePluginX,供有需要者使用,本人精力有限,欢迎有能力者一起维护~
注:如果 RePlugin 官方又开始活跃起来,积极加入一些新特性,且满足你的使用需求的话,强烈建议使用官方 RePlugin,毕竟开源不易。
# 1、版本信息
- RePlugin Base 版本:
2.3.4 - RePluginX release 版本:
v0.0.6 - GitHub 地址:https://github.com/GitLqr/RePluginX (opens new window)
# 2、新特性
相比 RePlugin,RePluginX 支持以下新特性:
- ✅ 支持 AnroidSupport、AndroidX 工程
- ✅ 支持 RePlugin Transform 开关 配置 (enable)
- ✅ 支持 坑位 Activity 的屏幕方向 配置 (screenOrientation)
- ✅ 支持 多版本 AGP 2.x 3.x 4.x (7.x 暂未兼容)
- 📝 未完待续...
注:后续 RePluginX 加入新特性时,我会在本文中继续追加。
| AGP | Gradle Wrapper | Support |
|---|---|---|
| 2.3.3 | 3.3 / 4.6 | ✔️ |
| 3.2.1 | 4.6 | ✔️ |
| 3.5.3 | 5.4.1 | ✔️ |
| 4.1.1 | 6.5 | ✔️ |
| 7.0.4 | 7.0.2 | ❌ |
注:AGP 即 Android Gradle Plugin
# 二、lib 库兼容 AndroidX
RePluginX 即可以在 Support 工程中使用,也可以在 AndroidX 工程中使用,原理其实很简单:运行时判断工程使用的 android 兼容包类型,再加载其中一类代码即可。
原则:(宿主/插件)工程的类加载器只加载
support和androidx其中的一种类,另一种类不能被类加载器加载。
关键实现步骤如下:
# 1、引入 android 兼容包
通过 provided / compileOnly 方式同时引入 support-v4 和 androidx.appcompat,这样 lib 就能正常使用各自兼容包的 api 来编写代码,而编译时又不会包含 support-v4 和 androidx.appcompat 的类,避免工程编译时出现类冲突问题。
provided 'com.android.support:support-v4:25.2.0'
provided 'androidx.appcompat:appcompat:1.1.0'
provided 'androidx.localbroadcastmanager:localbroadcastmanager:1.0.0'
注:因为
support-v4包含有localbroadcastmanager,而androidx.appcompat则不包含,所以需要单独引入androidx.localbroadcastmanager。
# 2、判断 android 兼容包类型
RePuginX 的 lib 库需要在运行时,通过反射判断(宿主/插件)工程真正使用的 android 兼容包类型,判断逻辑代码如下:
/**
 * 兼容层配置
 *
 * @author LQR
 * @since 2021/12/8
 */
public final class CompatConfig {

    private static volatile CompatConfig sInstance;

    public static final boolean DEPENDENCY_ANDROIDX;
    public static final boolean DEPENDENCY_SUPPORT;

    static {
        // FIX: 宿主工程(空壳)不一定会依赖 androidx.appcompat,但是一定会依赖 androidx.localbroadcastmanager
        DEPENDENCY_ANDROIDX = findClassByClassName("androidx.localbroadcastmanager.content.LocalBroadcastManager");
        DEPENDENCY_SUPPORT = findClassByClassName("android.support.v4.content.LocalBroadcastManager");
        // DEPENDENCY_ANDROIDX = findClassByClassName("androidx.fragment.app.FragmentActivity");
        // DEPENDENCY_SUPPORT = findClassByClassName("android.support.v4.app.FragmentActivity");
    }

    ...

    private static boolean findClassByClassName(String className) {
        boolean hasDependency;
        try {
            Class.forName(className);
            hasDependency = true;
        } catch (ClassNotFoundException e) {
            hasDependency = false;
        }
        return hasDependency;
    }
}
# 3、替换掉直接引入的 android 兼容包相关代码
RePlugin 的 (host/plugin) lib 库存在着大量直接引用 support 的代码,比如 LocalBroadcastManager、@NonNull 等等,@NonNull 直接全部移除掉即可,而 LocalBroadcastManager 则需要做一层包装,针对不同的兼容包,加载对应的 LocalBroadcastManager。为了让 lib 库原来的代码尽量少改动,我创建了一个同名类 LocalBroadcastManager,由它来判断具体加载哪个兼容包下的 LocalBroadcastManager:
/**
 * LocalBroadcastManager 兼容层
 *
 * @author LQR
 * @since 2021/12/8
 */
public abstract class LocalBroadcastManager {

    public static LocalBroadcastManager getInstance(Context context) {
        if (CompatConfig.DEPENDENCY_ANDROIDX) {
            return new LocalBroadcastManagerAndroidX(context);
        } else if (CompatConfig.DEPENDENCY_SUPPORT) {
            return new LocalBroadcastManagerSupport(context);
        }
        return null;
    }

    public abstract void registerReceiver(BroadcastReceiver receiver, IntentFilter filter);

    public abstract void unregisterReceiver(BroadcastReceiver receiver);

    public abstract boolean sendBroadcast(Intent intent);

    public abstract void sendBroadcastSync(Intent intent);

}

/**
 * AndroidX 的 LocalBroadcastManager
 *
 * @author LQR
 * @since 2021/12/8
 */
public class LocalBroadcastManagerAndroidX extends LocalBroadcastManager {

    private final androidx.localbroadcastmanager.content.LocalBroadcastManager localBroadcastManager;

    public LocalBroadcastManagerAndroidX(Context context) {
        localBroadcastManager = androidx.localbroadcastmanager.content.LocalBroadcastManager.getInstance(context);
    }

    @Override
    public void registerReceiver(BroadcastReceiver receiver, IntentFilter filter) {
        localBroadcastManager.registerReceiver(receiver, filter);
    }

    @Override
    public void unregisterReceiver(BroadcastReceiver receiver) {
        localBroadcastManager.unregisterReceiver(receiver);
    }

    @Override
    public boolean sendBroadcast(Intent intent) {
        return localBroadcastManager.sendBroadcast(intent);
    }

    @Override
    public void sendBroadcastSync(Intent intent) {
        localBroadcastManager.sendBroadcastSync(intent);
    }
}

/**
 * AndroidSupport 的 LocalBroadcastManager
 *
 * @author LQR
 * @since 2021/12/8
 */
public class LocalBroadcastManagerSupport extends LocalBroadcastManager {

    private final android.support.v4.content.LocalBroadcastManager localBroadcastManager;

    public LocalBroadcastManagerSupport(Context context) {
        localBroadcastManager = android.support.v4.content.LocalBroadcastManager.getInstance(context);
    }

    @Override
    public void registerReceiver(BroadcastReceiver receiver, IntentFilter filter) {
        localBroadcastManager.registerReceiver(receiver, filter);
    }

    @Override
    public void unregisterReceiver(BroadcastReceiver receiver) {
        localBroadcastManager.unregisterReceiver(receiver);
    }

    @Override
    public boolean sendBroadcast(Intent intent) {
        return localBroadcastManager.sendBroadcast(intent);
    }

    @Override
    public void sendBroadcastSync(Intent intent) {
        localBroadcastManager.sendBroadcastSync(intent);
    }
}
接着就是将 lib 库中所有的 LocalBroadcastManager 导包进行替换即可。
注:RePlugin 的 (host/plugin) gradle 插件源码中也有着许多关于
support的处理部分,参照之,并对androidx加入同样的处理代码配置即可,感兴趣的可自行查看 RePluginX 的 gradle 插件源码部分:replugin-host-gradle (opens new window)、replugin-plugin-gradle (opens new window)
# 三、坑位屏幕方向
因公司业务涉及 TV 行 业,TV 产品须固定为横屏,而 RePlugin 默认的 Activity 坑位是竖屏方向(插件清单文件中指定横屏是无效的,不妨自己试试看),所以需要对 RePlugin 进行定制,RePluginX 为了让满足 Moblie、TV 两类产品的需要,于是,在 host 的 gradle 配置中加入了 screenOrientation 配置项,宿主工程可以要根据项目需要,配置坑位屏幕方向:
apply plugin: 'replugin-host-gradle'
repluginHostConfig {
    screenOrientation = 'landscape' // 坑位 Activity 方向(portrait / landscape)
    ...
}
要实现这个功能也简单,只需要修改 (host) gradle 插件的两处地方即可:
RePlugin.groovy文件
class RepluginConfig {

    /**
     * 屏幕方向
     * 注意:默认是坚屏坑位:portrait,可配置为横屏坑位:landscape。
     */
    def screenOrientation = "portrait"
    ...
}
ComponentsGenerator.groovy文件
class ComponentsGenerator {
    // def static final oriV = 'portrait'
    def static oriV = 'portrait'

    def static generateComponent(def applicationID, def config) {
        updateConfig(applicationID, config)
        ...
    }

    def static generateMultiProcessComponent(def applicationID, def config) {
        updateConfig(applicationID, config)
        ...
    }

    /**
     * 更新配置
     */
    def static updateConfig(def applicationID, def config){
        oriV = config.screenOrientation
    }
}
# 四、发布 jitpack
网上有很多发布 jitpack 的教程,基本操作如下:
Step 1: 工程根目录下的 build.gradle 中添加如下插件依赖:
classpath 'com.github.dcendents:android-maven-gradle-plugin:2.1'
Step 2: lib 库目录下的 build.gradle 中配置该插件:
apply plugin: 'com.github.dcendents.android-maven'
group='com.github.username' // 例如:com.github.GitLqr
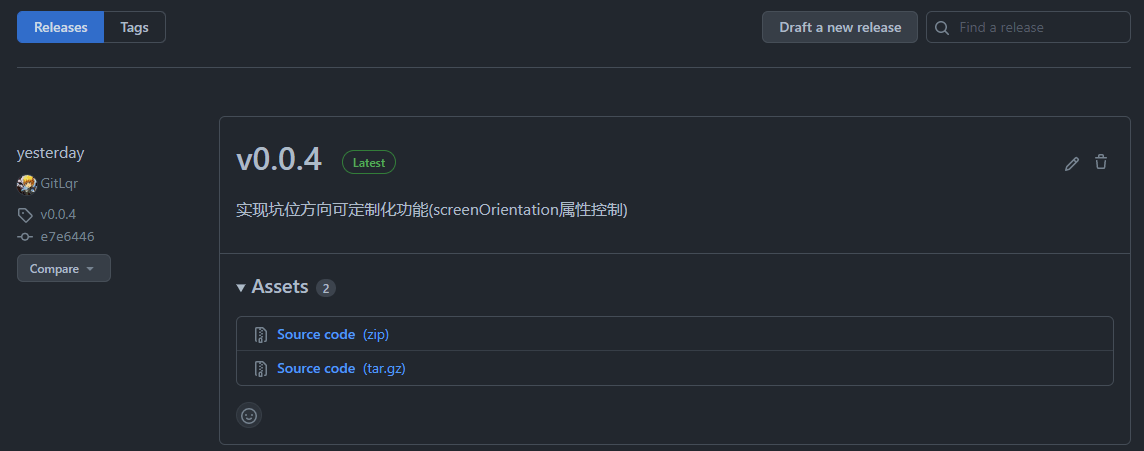
Step 3: 在工程的 github 网页中创建一个 release:

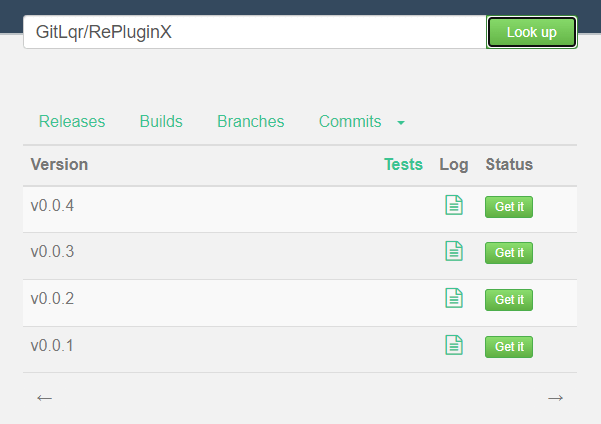
Step 4: 在 jitpack.io (opens new window) 搜索 username/repoName:

注:release 刚刚创建时,还需要等
jitpack.io排队抓取,大概需要 5-10 分钟,可以通过图中Status栏判断当前的抓取状态,当Log栏出现文档 icon 时,说明抓取完毕,项目就可以正常依赖使用 lib 库了。
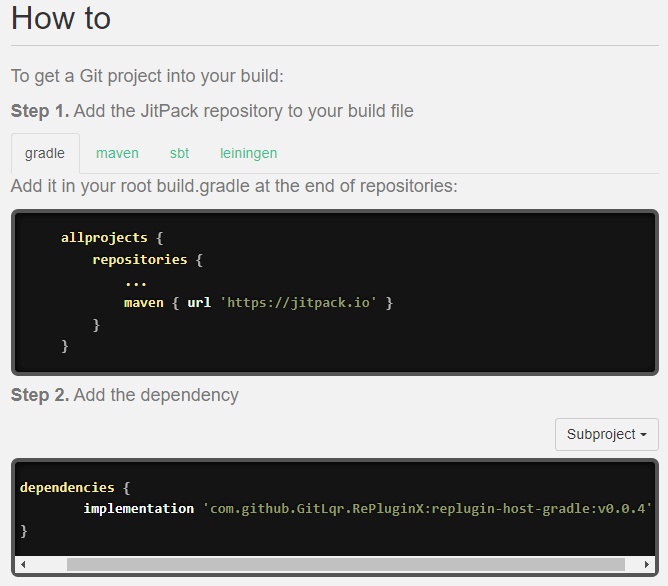
Step 5: 点击 Get it 按钮,根据依赖指引在项目工程中添加依赖即可:

以上几步便是 jitpack 的发布流程了,眼尖的你可能会发现图中有个 Subproject 下拉按钮,展开之后是长这样子的:

这里需要提一下,网上的教程所举案例基本上都是一个 repo 对应一个 lib 库(module),是不会有 Subproject 下拉按钮的,而 RePluginX 则不一样,RePluginX 这个 repo 中包含了 2 个 lib 库和 2 个 gradle 插件:
- 【replugin-host-gradle】 (opens new window)
- 【replugin-host-library】 (opens new window)
- 【replugin-plugin-gradle】 (opens new window)
- 【replugin-plugin-library】 (opens new window)
是的,jitpack.io 支持一个 repo 多 module 发布,通过在 google 上搜索到的几篇文章,给出的结论是,不管是 gradle 插件,或是 lib 库,配置的方式跟上面的一样,jitpack.io 在抓取的时候会自动识别区分,但是依赖的规则会发生变化:
// 一个repo对应一个lib库
compile 'com.github.USERNAME:REPO:VERSION'

// 一个repo对应多个lib库
compile 'com.github.USERNAME.REPO:MODULE:VERSION'
比如【replugin-host-gradle】、【replugin-host-library】... 的 build.gradle 中都是如下配置:
apply plugin: 'com.github.dcendents.android-maven'
group='com.github.GitLqr'
之后各自的依赖配置如下:
classpath 'com.github.GitLqr.RePluginX:replugin-host-gradle:v0.0.4'
implementation 'com.github.GitLqr.RePluginX:replugin-host-library:v0.0.4'
classpath 'com.github.GitLqr.RePluginX:replugin-plugin-gradle:v0.0.4'
implementation 'com.github.GitLqr.RePluginX:replugin-plugin-library:v0.0.4'
关于jitpack.io 一个 repo 发布多个 module 的相关文章:
- https://jitpack.io/docs/ANDROID/ (opens new window)
- https://jlelse.blog/dev/multi-module-jitpack (opens new window)
- https://stackoverflow.com/questions/41959503/how-do-i-push-two-libraries-in-the-same-project-in-jitpack-io-using-android-stud (opens new window)
# 五、管理多个工程
RePluginX 与 RePlugin 在工程结构上有些许变化:
| Name | RePlugin | RePluginX |
|---|---|---|
| replugin-host-gradle | project | module |
| replugin-host-library | project | module |
| replugin-plugin-gradle | project | module |
| replugin-plugin-library | project | module |
| replugin-sample/host | project | project |
| replugin-sample/plugin/plugin-demo1 | project | project |
| replugin-sample/plugin/plugin-demo2 | project | project |
| replugin-sample/plugin/plugin-demo3-kotlin | project | project |
| replugin-sample/plugin/plugin-webview | project | project |
- 在 RePlugin 项目中,RePlugin 仅仅只是一个目录,该目录下包含了 n 个 project,例如【replugin-host-library】【replugin-plugin-library】分别是 2 个 project(有各自的
settings.gradle文件) - 在 RePluginX 项目中,RePluginX 是一个真正的 project,【replugin-host-library】【replugin-plugin-library】 则是 RePluginX 的 2 个 module,RePluginX 现有 4 个 module,即【replugin-host-gradle】【replugin-host-library】【replugin-plugin-gradle】【replugin-plugin-library】。
接下来就比较有意思了,我们知道 RePlugin 仅仅只是一个目录,这意味了,其下的所有工程,都必须各自开一个 AndroidStudio 来进行编码、调试,如果你电脑内存够大,还配有多个显示器,那可能也觉得没什么大不了的,但如果没有以上条件,就会觉得相当难受了。另外,我个人认为,如果一个项目,能在一个 AS 窗口下管理宿主和插件,会比较舒服(我希望一个 AS 窗口对应一个项目,而不是具体哪个工程),RePluginX 通过 gradle 3.1 提供的 includeBuild 解决了这个问题,这是 RePluginX 根目录下 settings.gradle 文件中的内容:
// 当前工程 Module
include ':replugin-host-gradle'
include ':replugin-host-library'
include ':replugin-plugin-gradle'
include ':replugin-plugin-library'

// Support Demo 工程
includeBuild('./replugin-sample/host')
includeBuild('./replugin-sample/plugin/plugin-demo1')
includeBuild('./replugin-sample/plugin/plugin-demo2')
includeBuild('./replugin-sample/plugin/plugin-demo3-kotlin')
includeBuild('./replugin-sample/plugin/plugin-webview')
includeBuild('./replugin-sample-extra/fresco/FrescoHost')
includeBuild('./replugin-sample-extra/fresco/FrescoPlugin')

// AndroidX Demo 工程
includeBuild('./repluginx-sample/host')
includeBuild('./repluginx-sample/plugin/plugin-demo1')
并且在各个 project 根目录下的 settings.gradle 文件中指定了 project 的名字,避免命名冲突:
// replugin-sample/host/settings.gradle
rootProject.name = 'replugin-sample.host'

// repluginx-sample/host/settings.gradle
rootProject.name = 'repluginx-sample.host'
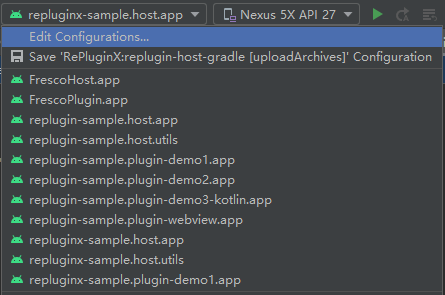
于是乎,在 AS 打开 RePluginX 工程并加载完成之后,可以看到运行窗口会出现以下配置列表:

这下就舒服了,强烈推荐业务项目也参照 RePluginX 管理多个 project 的方式,利用 includeBuild 将 宿主工程 和 插件工程 用一个工程来管理,除此之外 includeBuild 还可以配置替换掉子工程中的 Module 依赖,更多 includeBuild 的使用请移步查阅 gradle 官方文档:https://docs.gradle.org/current/userguide/composite_builds.html (opens new window)
# 六、最后
如果你觉得文章还不错,或是 RePluginX 这个项目能够对你有所帮助的话,不妨点个免费的 Star 或 Fork,这对我帮助很大,感谢。

- 01
- FlutterEye - 发现你手机里的 Flutter 应用01-18
- 02
- Flutter 拖拉对比组件,换装图片前后对比必备11-09
- 03
- Flutter 多仓库本地 Monorepo 方案与体验优化10-25
